

5 Steps to an Easier HubSpot Setup

Setting up HubSpot can seem like a daunting task, especially for businesses new to this powerful platform. However, with the right approach, you can streamline the process and unlock its full potential without the stress. In this guide, we’ll walk you through five essential steps to make your HubSpot setup easier, ensuring you can harness its robust marketing, sales, and customer service tools efficiently.
From initial configuration to segmenting your contacts, these steps will help you get up and running smoothly, setting the stage for sustained success.
1. Set up your account and invite your team
When you set up your account, you’ll be given the option to invite other people to access your HubSpot CRM portal, change settings and permissions on the account, and collaborate with you in HubSpot.
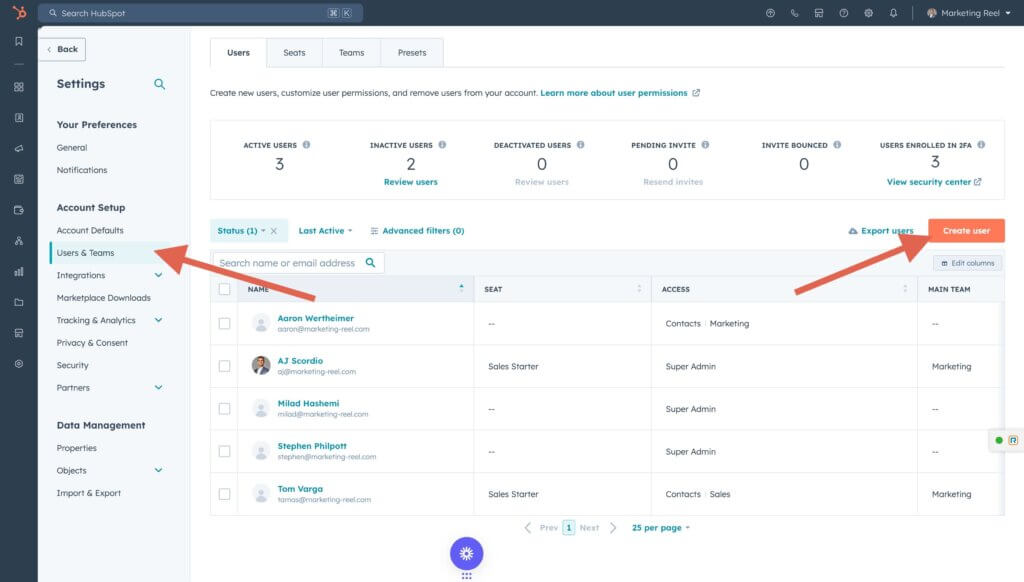
Creating Users
Access Settings: In your HubSpot account, click the settings icon in the top navigation bar.

Navigate to Users & Teams: In the left sidebar menu, select Users & Teams.
Create User: Click the Create user button in the upper right.
Setting Up User Access Levels
Assigning seats and permissions is crucial to defining what each user can access and do within your HubSpot account. Depending on your account’s creation date and subscription type, you might have different options:
Assign Seats: Select the appropriate seat type for each user from options like Core Seat, Sales Hub Seat, Service Hub Seat, View-Only Seat, or Partner Seat.
Choose Permissions: You can either use default seat permissions, make users Super Admins, start with a role-based template, or fully customize permissions from scratch.
HubSpot will automatically send out an invitation email to all users, allowing users to set up a personal HubSpot account under their name to access your shared HubSpot platform.
2. Connect your domains with HubSpot
Connecting your domains inside HubSpot is a powerful way to streamline and enhance your digital marketing efforts. By integrating your website domains with HubSpot, you can centralize your marketing, sales, and customer service activities, making it easier to track and analyze performance across all your online channels. This connectivity allows for more efficient management of content, SEO, and campaigns, ensuring a cohesive brand experience for your audience. Additionally, it provides access to HubSpot’s comprehensive suite of tools, enabling more effective lead generation, personalized marketing, and data-driven decision-making.
Connect your website domains (primary, secondary, redirect )
To connect your website domains to HubSpot, make sure to follow this process:
- Click the Settings icon (looks like a little cog or wheel)
- In the left sidebar menu, navigate to Website > Domain & URLs
- Click Connect a domain, and
- Select the type of domain you want to connect
- Click Connect
- Verify the URL by linking it it to GoDaddy (you can do this either manually or automatically)
Once your web domains are connected, you’ll be better situated to respond in real-time to potential leads and web visitors as they browse your content.
Enable email-sending domains

To ensure your marketing emails comply with major providers like Gmail and Yahoo Mail, connect your email sending domain to HubSpot by setting up DKIM, SPF, and DMARC records in your DNS settings.
Understanding DNS Records:
- DKIM: Verifies email content integrity.
- SPF: Confirms the email is sent from an authorized server.
- DMARC: Guides handling of emails failing DKIM or SPF checks.
Authenticated emails are favored by providers, reducing bounce rates and spam categorization. Quarantined emails appear delivered in HubSpot but are invisible to most recipients. Setting up DKIM is essential for better deliverability.
Start the DNS configuration or review your authentication status in HubSpot to ensure your emails reach your audience.
3. Install HubSpot’s tracking code for your website
“I’m being tracked?” Fortunately not, so not to worry.
Each HubSpot account is given a unique code that helps HubSpot determine the source of visitors (also known as web traffic) to your website. Essentially, the HubSpot tracking code helps you see which of your visitors came from which web page or destination.
If you have pages that are hosted outside of HubSpot’s CRM, you’ll need to install HubSpot’s tracking code manually for each domain and subdomain hosted outside of the CRM.
4. Configure account settings & more
To ensure a smooth HubSpot setup, complete these essential tasks:
a) Define Your Physical Address
Ensure compliance with email marketing laws and build trust by adding your physical address to emails.
b) Set Up Email Subscription Types
Allow contacts to choose their preferred email types, enhancing user experience and reducing unsubscribes.
c) Confirm Time Zone
Set the correct time zone for accurate scheduling and tracking of your marketing activities.
d) Filter Out Internal IP Addresses
Exclude internal traffic from your analytics to maintain accurate data.

e) Connect your social media accounts to HubSpot
After completing these essential tasks, it’s important to connect your social media accounts to HubSpot to guarantee that all your communication mediums sync up and offer you responsive, reliable, and accurate data across channels and mediums. That way your marketing, sales, operations, and service teams can be on the same page.
4. Import the technicals: contacts, data, and more

You’ve got your account and default settings configured just right, invited your team members to partner with you in HubSpot’s CRM, and now, you’re pretty deep in the HubSpot setup process. It’s time to get started on importing contacts & corresponding data into your platform.
Integrate data with Hubs (Marketing, Sales, and Service)

The more information you have in your CRM, the better your sales, customer service, and marketing teams will be at focusing on outreach to prospective leads.
Here’s how to import the technicals like a pro.
Importing Data Into HubSpot
As you progress through your HubSpot setup, one of your initial tasks will be importing your existing data into the CRM. Whether your data is stored in Excel spreadsheets or an older CRM, HubSpot’s import tools streamline the process, ensuring your data is accurate and ready for use by your team.
What Can You Import into HubSpot?
Understanding the elements of HubSpot’s data model is crucial for a smooth import process. Here’s a breakdown:
Contacts and Objects
Objects are the core components you track in the CRM, such as contacts, companies, and deals. Each object consists of multiple records (rows in your spreadsheet), with each record containing properties (columns in your spreadsheet). These properties are essential for creating new records or updating existing ones during import.
Companies and Associations
Associations link different records, enabling your team to view related information quickly. For example, when importing contacts associated with companies, include company information in the same row as the contacts. If using two separate files, ensure a common column exists to create the association. Adding labels can further clarify the relationship between records.
Activities
Activities represent interactions your team has with CRM records, such as notes on deals, meetings, or calls with customers. These can be imported and associated just like records, allowing you to track team productivity and performance.
5. Set up a form and start segmenting leads
Create and embed a HubSpot form on your website
Setting Up Forms:
- Navigate to your HubSpot account and go to Content > Website Pages or Landing Pages.
- Select the page and click the form module.
- Customize the form settings, choose an existing form, or create a new one.
Create and Add Forms
After creating a form in HubSpot, you can add it to any form module on your website or landing pages. Customize the form’s settings and styling for each page, including what happens after submission and the appearance of elements like the submit button.
Create segmented lists and lead flows
Segment your leads into lists based on specific contact and company attributes to deliver more contextual messaging to prospects and customers. This ensures you can effectively address each client’s unique needs at any stage of the sales funnel with tailored communication.
HubSpot setup support is just a click away

Your HubSpot setup may seem daunting at first, but with the right help, it’ll feel like a breeze. Our team has been working with HubSpot for years, so we feel we’ve learned a thing or two over the last decade.
Whether you need assistance with HubSpot setup, building out automation processes, or even a new website, our HubSpot professionals can help. With certifications from HubSpot Academy, our HubSpot aficionados would be happy to provide you with helpful, timely instruction for all your HubSpot needs.
Your business is a diamond in the rough, and we want to help it shine. Don’t hesitate to contact us at any time to learn more about how HubSpot can help your business thrive.